Thursday, February 2, 2017

Halflings, Part III (LeafGrave project)

Judge me by my size, do you?

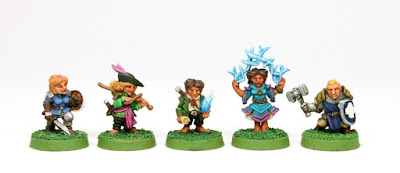
Those of you actually reading my ramblings may recall that the Halflings are meant, amongst other things, to play some Frostgrave games (which I renamed LeafGrave for this project). And to play LeafGrave, you need at least two very important things : 1) a wizard and 2) an apprentice. So it was time to paint one of each! Also this week a Paladin, a bard and a fighter.

From left to right: Fighter, Bard, Apprentice, Mage and Paladin

The Mage is to be used as an Elementalist for LeafGrave. I didn't painted the Apprentice in the same colour scheme as the Mage, which many people do, as I wanted the Apprentice to blend with other of my Halflings wizards. 


Because yes, I have a few more Halflings wizards from that range so that will leave me the option of building different Halfling warbands with different wizards. I expect you'll see at least one or two more practitioner of magic in the next month or so! I did however gave the apprentice the same type of "lightning blue" magic flame to tie him up. 

I hope you keep enjoying the little guys as much as I enjoy painting them. It's like going through all the possible D&D Character classes, 5 Halflings at a time.

More Halflings (possibly, probably) to come next week!

And another 25 pts for the Challenge

Thursday, January 26, 2017

Female Assassin

Assassins take no pride in fighting fairly. We take pride in winning.

A single piece for this week's Challenge; a female assassin from Dark Swords Miniatures. The figure is not attached to any planned games or project, really, it's a Christmas gift from the girlfriend. Now usually when she gives me figures as gift they go into the lead pile, and she gets to see them painted many moons later, so this year I decided to do something different and put it in my priority pile!

So there she is, I painted her as a single so I did spend more time on her than most other figures, and I'm really happy I did as I think she looks gorgeous! The figure itself is n awesome sculpt and has that nice Old School vibe the fantasy masters at Dark Sword still manage to produce. It's a very simple sculpt, no skulls or extra belts and stuff, but it is very effective.


Yes, I couldn't resist using some pink on the female warrior, cliché you might say, but I just love the colour and any excuse to use it is good with me! I tried to offset the bright colour with a darker mauve cloak, a very simple basing and some grey pants. I quite like the final results.


Now, of course, being who I am it might just be the start of a Frostgrave or Songs of Blades and Heroes warband! Somewhere the evil masters at Dark Swords are smiling, knowing I need at least 10 more of their figures...

(and a small but satisfying 5 pts for the Challenge)

Friday, January 20, 2017

Halflings Part II (LeafGrave project)

More StoneHaven Halflings this week, as I'm keeping up with my goals of painting 5 per week. The little buggers are a ton of fun to paint, and since each one is very different it keeps me from being bored of painting the same thing.

And so this week we have a gardener, a lorekeeper, a ranger, a ratcatcher and a skelly.


From left to right : Ranger, Gardener, Ratcatcher, Skelly and Lorekeeper


I exceptionally went with a different base style for the skeleton as the nice and happy goblin green didn't seem to fit very well with him. That figure is very cool, and the smoking pipe is a nice touch. I love the funny details on many of them; if you look closely, the Lorekeeper, just like any good teacher, has elbow patches on his jacket!

Same as the previous Halflings,  I used green and brown when possible while still going all over the place in terms of colours, to keep their individuality.

25 more points for the challenge!

Thursday, January 19, 2017

Photographing Miniatures : Part II, setting up your camera

So last time we discussed how I got my perfect set-up. You can imagine my frustration when I took some pictures and still they were dark and out of focus. After reading a few tutorials and some trial and error, I came up with settings which work very well for me.

So, everything needed was inside my camera, with the essential help of a tri-pod. To follow this Tutorial you need a good digital camera (mine is a Canon IOS Rebel T3) that you can put in "manual setting" and one which lets you play with Aperture, Iso and Shutter speed (exposure).

First and most important advice : DO NOT put your camera on "Macro" or "Auto" mode. I did this for years. It doesn't work for miniatures photography. What you want to do is control the settings of your camera manually. (BTW I'm no expert, what you are about to read has been picked up from the web and many tutorials. It might containt mistakes on the technical terms! I try my best, but I'm a self made man ;-) ).

Aperture is ‘the opening in the lens.’

When you hit the shutter release button of your camera a hole opens up that allows your cameras image sensor to catch a glimpse of the scene you’re wanting to capture. The aperture that you set impacts the size of that hole. The larger the hole the more light that gets in – the smaller the hole the less light. Aperture is measured in ‘f-stops’. In our case, we want a  a smaller hole (high number) so that everything is in focus. I go with f22.


In very basic terms, ISO is the level of sensitivity of your camera to available light. The lower the ISO number, the less sensitive it is to the light, while a higher ISO number increases the sensitivity of your camera. The ISO setting changes the sensitivity of the sensor. A low number like 100 will be crisp but will require a lot of light to expose the picture correctly. An ISO of 3000 will not require that much light but will be very grainy. I often read 400 is a good number, but I went with 200 and the results were remarkably better.

Shutter speed, also known as “exposure time”, stands for the length of time a camera shutter is open to expose light into the camera sensor. If the shutter speed is fast, it can help to freeze action completely. If the shutter speed is slow, it can create an effect called “motion blur”, where moving objects appear blurred along the direction of the motion. In our case, you want to play with the exposure meter (-2..1..0..1..+2). This is where I had so much difficulty. I kept changing the shutter speed setting until the cursor was on 0, but that always gave me too dark of a picture. Took me a while to figure that one out! Now I over exposure on the exposure metre about two clicks to get a brighter picture and a whiter background (so +2 instead of 0).

However, the long shutter speed means that, if you are holding the camera the picture will be blurry because of all the camera shake. This is where the Tri-pod comes into play, because we are going to use a long timer; with a long shutter speed just pressing the button can move the camera. The timer eliminates that. I use a full 10 seconds timer. You might say it's annoyingly too long, but honestly with all of the settings described above I rarely take more than 2-3 pictures of any subject to find my perfect picture. So basically 20-30 seconds per good picture is something I can live with!

Officially, I'm still missing two things; a better background (I like blue gradiant, although my current white works just fine) which I ordered from a recent kickstarter, and something to work on my white balance. But I'm a little lazy at times, so I let my Mac's IPhoto deal with my white balance, usually by "lightening" the picture just a tad.

So here you go! In recap, ISO of 200, Aperture of F22, +2 on the exposure meter, 10 seconds timer and a good tripod. Works for me! Of course, you might have to do your own tests so that you find what works best with your camera, set-up, lighting available, etc. It was a pain to spend time figuring all that out but now I think it's worth it!

My camera sitting on the Tri-Pod, with the proper settings

I'm very, very happy I finally managed to get it right, it is really such a relief. After figuring everything out, I spent a couple days smiling, and annoying the girlfriend by answering every problems with a "don't care, figured out my miniature photography".

So now not only are all the settings good, but everything is set-up just the way I want; fast, quick and quality pictures at the roll of a chair! Some recent examples of photography from the new set-up :


Tuesday, January 17, 2017

Photographing miniatures, Part I; tools and set-up

Since I started blogging, my bane has always been Photographing miniatures. I hate it because it takes forever to set-up, and that means spare time not used to painting; I hate it because it always end costing money, from tri-pod to cameras to light-box, etc. (and again that means money not spent towards my hobby), and mostly I hate it because I'm not very good at it, and my pictures always end up too dark and I have to take 50 pictures to get two "good enough" picture. It has, in the past, played a role in irregular blogging posting habits. I would often wait until I had enough figures painted to spend an entire afternoon taking pics. But this way of doing thing really didn't work well with regular blog posts, and it's especially problematic during the Analogue Hobby Challenge, as I find it important to try to get a good rhythm and post every week or at least every two weeks.

So when I moved this Spring to a new house, I decided I needed to fix this issue once and for all, especially since I had the room needed; i'm indeed lucky enough to have an office (which also serves as my toys/comics collection room) upstairs to myself, as does Laurie. There were a number of things I wanted to adress, and it took me a long time to all put it together, mostly because I had to wait a few months because I was broke after the house move! So I wanted the following :
  • Permanent photography set-up. In the past I tried everything, from taking my pictures outside (not so good when summer is basically 3 months a year in Montréal), to setting up a table corner with terrain, to try to take pictures in front of a simple white paper sheet. All these would take time to install; bringing the terrain needed, getting the tri-pod, etc. I wanted something which would always be easily accessible, no set-up required.
  • A lightbox or something similar. I like to use my terrain for gaming, not taking pics, so I decided to go for a lightbox, with a permanent backgroup. Now, I like my house and my office to look nice, so not only did I wanted the box to be efficient and if possible cheap, I also wanted it to look smart in my office. So no home-made cheap looking cardboard box! 
  • A set-up right next to my computer; when taking pics outside or in the basement, you always have to go up and down the stairs to download your pics, and to double-check they are ok, etc. It's a lot of time wasted, and moreover not the best idea for my knees. 
So now lets look at the solution, which is fairly simple really. I already had a tri-pod (which I think is a must to take proper pics of minis) and a good camera. I needed a lightbox!

While perusing an Oldhammer blog, I found a review for the Foldio lightbox; it's a cheap lightbox, incredibly easy to assemble, small enough to fit on an office desk. And it was available through Amazon! And finally, it looks quite good and fits very well with the aesthetics of my Mac computer and office in general. I actually bought the Foldio 2, which is bigger and has more light than the Foldio 1, two problems mentioned by Matthew in his blog

However, lighting was still an issue, and indeed you don't have enough. I fixed this by buying two desk lamps and equipped them with daylight bulbs; faster and easier than buying more lights of the Foldio guys in Korea!

Here's a picture of the (permanent) set-up. 


To take pictures, I just roll my chair a bit to the left, get in front of the tri-pod, open all the lights and I'm done. 30 seconds and I'm in photography mode.


And then, to download the pics, I move the tri-pod with the camera still attached to it a few centimeters, and connect the USB cable straight from my usb multiple port adapter to the camera.


20 seconds later pics are uploaded, and I know if they are good. Yes, the whole point of this is to minimize as much as humanly possible all time devoted to photographing miniatures, while still getting great results. Toyota would call it "the lean method".

Of course, nothing is easy about Photographing miniatures, so I quickly realized that, while the set-up was great, my pictures still weren't...so stay tune for Part II!